Showing posts with label diy. Show all posts

Tuesday, October 24, 2023

Bridging the Veil: An Anointing Oil Recipe for Ancestral Communication

ancestral communication, ancestors, ancestor veneration, anointing oil, spell, ritual, hedgecraft, hedge witch, green witch, kitchen witch, witchcraft, witch, pagan

As the veil between our world and the spirit realm thins once again as Samhain approaches, communication with our ancestors becomes easier. Across cultures, ancestors have been revered as guardians of wisdom and guides in our earthly journeys, with many cultures creating altars and shrines to honor said ancestors. Today we will create an anointing oil specifically attuned to the thinning veil of Samhain using herbs and spices associated with the season, a fragrant homage to honor, connect, and communicate with the spirits of our lineage.

What You'll Need

  • 1 part dried mugwort
  • 1 part dried yarrow flowers
  • 1 part allspice (1/2 the amount if you are using ground)
  • 1 part dried rosemary
  • Grapeseed oil or another oil base to cover
  • Obsidian or amethyst chips (optional)
  • Amber bottle

What to Do

There are two different methods that can be employed the create this anointing oil: sunning and simmering. Sunning will take approximately 4 weeks to create while simmering will take about an hour from start to finish. For the sunning method, combine equal parts of mugwort, yarrow, allspice, and rosemary in a clear jar and cover with grapeseed oil or your oil of choice. Seal and place in a sunny window for 4 to 6 weeks before straining into an amber bottle. Top with obsidian or amethyst chips and store in a cool, dark place until ready to use.

For the simmering method, combine equal parts of mugwort, yarrow, allspice, and rosemary in a saucepan and cover with grapeseed oil or your oil of choice. I fill my amber bottle with oil first then add it to my saucepan to ensure I don't create too much. Bring the mixture to a boil then reduce the heat until the oil is lightly simmering. Allow the mixture to simmer for at least 10 minutes until fragrant. Stir clockwise often and adjust the temperature as needed to prevent the herbs from scorching. Strain the mixture into your amber bottle. Top with obsidian or amethyst chips and store in a cool, dark place until ready to use.

This anointing oil is pretty versatile and can be used to clean your ancestral altar, dress candles, or even as an offering to your ancestors. You can also use it to open the doors of communication with the dead by anointing your third eye prior to attempting communication.

Why You Did It

Understanding the whys of a spell (or recipe) is just as important as performing it. It helps you understand the process so you can modify the spell or ritual to suit your needs and helps guide you to write your own. It's my intention that by providing these explanations, you can build a better understanding of how spells are written and executed so you can modify and build your own spells (the goal of my Spellcrafting Series). 

This particular recipe relies on the power of several different herbs, each deeply associated with spirit communication, death, funerary rites, and ancestral veneration. Mugwort is one of the most potent herbs in this oil, historically being used to enhance and induce psychic visions, enhance spirit communication, attract ghosts, and aid in astral travel such as hedge riding. As a hedge witch, mugwort is a staple in my personal practice. While burning or smoking is the most effective use of mugwort for these purposes, they still lend their aid in this anointing oil. Yarrow was one of the first funerary herbs ever used by humans, its pollen being found in graves some 60,000 years old. While some debate whether or not this pollen was intentionally placed, it matters not. Yarrow has long been connected with death and our transition to the Otherworld. Yarrow has the ability to anchor us in reality while opening the lines of communication between the living and the dead. Its most often used to see the unseen and is therefore used in spirit communication and during divination rituals. Allspice is traditionally associated with good luck and fortune and its potent aroma is often used to awaken. In this particular recipe, it's used to awaken your ancestors, aiding them in finding their way to you, as well as to garner their favor and increase your chances of successfully communication with them. Finally, rosemary was added to enhance memory, gain clarity, and strengthen communication as rosemary is the herb of remembrance. Rosemary is also deeply associated with protection, warding off any negative entities that may try to interrupt, confuse, or hijack your communication with your ancestors.

Finally, obsidian or amethyst chips were added to the oil to further enhance ancestral communication. Obsidian has long been regarded as a scrying tool, its shiny glass surface being used to induce visions into the beyond. As such, it's associated with spirit communication. Amethyst is associated with intuition and increases psychic abilities, helping open the user's third eye so messages can be easily received. By adding amethyst to this oil, it increases the oil's potency.

Remember to record this recipe in your Book of Shadows for reference later.

***

As the veil continues to thin, I hope you will take this time to engage in spirit work, commune with spirits, and venerate your ancestors. This is the best time to work on forming and maintaining these relationships, so use it wisely!


Interested in learning more about ancestral communication and veneration? Below are some resources to get you started.


If you liked this post and would like to support future content, please consider leaving a small tip in the jar. 

Monday, January 31, 2022

DIY Imbolc Paper Lanterns


Imbolc is right around the corner and what better way to celebrate the sabbat of light than with lanterns. Usually, I see people making ice lanterns during this time, which are great and reflective of the season but don't work out so well if you live in a Southern state like Georgia. That's where paper lanterns come in. These globe paper lanterns are made using glue, white tissue paper, and fresh and dried plant material to create a snowy look-alike that will cast a soft glow over your Imbolc or Winter Thermistice altar.

Supplies

     White Tissue Paper, torn into small, irregular pieces
     Dried and fresh plant material such as leaves and flowers
     Glue+Water or Mod Podge
     Old Paintbrush
     Balloons
     Scissors


Directions

Begin by blowing up the balloon to the size you want your lantern to be. Working in sections, brush the glue mixture onto the balloon and place the white tissue paper over top. Seal the tissue paper with a layer of glue, ensuring the entire balloon is covered in at least a single layer of tissue paper with no loose ends. Be sure to leave an open at the base of the balloon so you can later remove the balloon.


Once the balloon is completely covered in tissue paper, begin gluing down your plant material. I used leaves from an evergreen bush to symbolize eternal life, growth, and fertility, rose petals for love and friendship, and white orchid blooms for love, fertility, and purity. Cover all leaves and flowers with a layer of tissue paper and completely seal the lantern with another layer of glue, making sure there are no loose ends or gaps. Use a cup, paper towel roll, or another support to prop up the balloon and allow the lantern to completely dry. The lanterns using dry within 2 hours.


Once dry, pop the balloon and remove it. Cut an opening in the bottom large enough to place a battery-operated candle or fairy lights. While you can use tea lights, I would strongly advise against it because the tissue paper is highly flammable. The last thing you want to do is burn down your house!


This activity is perfect for all ages and a great way to connect with the season. The white tissue paper creates an icy look that will last for many seasons if you wish to keep them, or the entire lantern can be given as an offering since all the materials are completely biodegradable. These are perfect for indoor or outdoor use, but, again, I advise against real flame lest you catch the lantern on fire. These lanterns can also be made later in the year using orange, red, and yellow tissue paper to represent the Sun and yellow flowers and plants for Beltane or Midsummer. The possibilities are endless!


If you liked this post and would like to support future content, please consider leaving a small tip in the jar. 
Monday, July 8, 2019

DIY Bee Bath

DIY Bee Bath

While we have recently had some rain here in Georgia, I know we are well on our way to it becoming scarce again. When water is scarce, local wildlife suffers, especially bees. Obviously, bees are tremendously important, pollinating our plants so they may bear fruits for our consumption. Plus, they are delightful to watch in my garden. Other than planting lots of flowering plants, you can help the bees in your witchy gardens by creating a Bee Bath, aka a bee drinking waterer. This is a really super simple project that can be done cheaply and the bees will thank you for it. Heck, the toads and lizards in your garden will likely thank you too! This is so easy, that you can make them with your little witchlings and make them as simple or as intricate as you like. Furthermore, creating a bee bath is a great way to honor both Earth and Water elements in your garden; Earth because you are nourishing the Earth's creatures and Water because you are making a sacred place for Water within your garden.

Supplies

     Terra Cotta Saucer
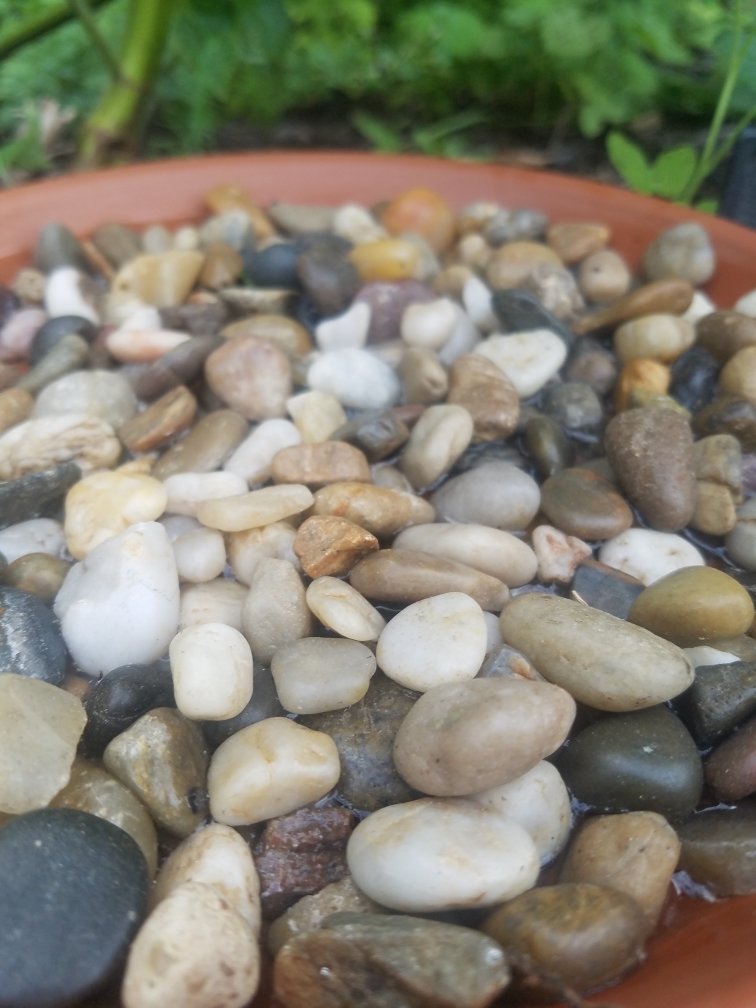
     Stones, marbles, or mosaic glass gems (easily picked up at Dollar Tree)
     Citrine or Carnelian chips (or other crystals of your choosing)
     Water
     Terra Cotta Paint (optional)

Directions

Begin by decorating the outside of your saucer with terra cotta friendly paint, if you wish. Do not paint the inside as 1) you won't be able to see it once the stones and water are in place, and 2) you run the risk of the paint being toxic to wildlife. I didn't paint mine because I liked the way the saucer looked to begin with, but if you want to decorate it, I suggest using sigils and images for health, vitality, strength, and endurance so that the wildlife that drinks from your bee bath will be given a little boost. If you don't want to decorate the outside, place these symbols on the underside of the saucer.

Once your saucer is decorated, fill the bottom with your stones, marbles, or mosaic glass gems. Spread them evenly on the bottom. Sprinkle your citrine or carnelian chips amongst the filler. Citrine and carnelian both symbolize strength and endurance, which bees and other wildlife visiting your bee bath need to make it through extreme temperatures and drought during the summer months.

After the bottom of the saucer is filled, fill the saucer with cool water until it's just at the edge of the filler. You don't want the filler to be completely submerged, as the bees need to be able to rest on the rocks while they drink, otherwise they will drown. Please note that terra cotta absorbs water, so after you initially add water, you will likely need to add more water 30 minutes later. You can see in the pictures below I already need to add more water to mine! If you wish, place your hand over the bee bath and bless the water. Imagine it filling with life-giving properties to support the wildlife in your garden.

DIY Bee Bath

Finally, place the bee bath outside in your garden in a shaded area on level ground or elevated. If you place it directly in the sun, the water will heat, causing bees not to visit, and it will evaporate rather quickly. Be sure to refill the bee bath daily. During especially hot weather, check the bee bath more than once a day. If the bee bath begins to grow algae, scrub the contents with soap and water and refill. Feel free to bless the water each time you add more.

DIY Bee Bath

And there you have it! I told you it was simple! If you happen to make one yourself, please share pictures in the comments below! I would love to see your work!

Thursday, June 7, 2018

DIY Summer Solstice Sun Wheel

 DIY Summer Solstice Sun Wheel

I am excited to share this wonderful craft with you today! Every year I look at possible decorations and crafts for the Summer Solstice, and every year I see beautiful sun wheels. Last year I actually bought some supplies to make a sun wheel, but never got around to it. Well, this year I decided enough is enough; I am going to make that darn sun wheel!

Sun wheels are usually equal-armed crosses within a circle. They have been used by a variety of cultures, including the Celts and Vikings. Sometimes referred to as Odin's Cross, the sun wheel is believed to invoke power, fertility, life, abundance, and peace, attributes often attributed to the Sun. The four equal divisions in the sun wheel represent the four seasons (spring, summer, fall, and winter) as well as the four directions (North, East, South, and West) and the solar calendar marked by the 4 solstices/equinoxes. However, modern pagans have begun using the traditional God's Eye to make images of the sun, thus we have developed a modern version of this ancient symbol to invoke the same powers.

DIY Summer Solstice Sun Wheel

To make this modern version of the sun wheel, you will need a couple of items, including:
  • 4 branches of the same length
  • yellow, red, orange, brown yarn, string, ribbon, twine, or raffia
  • scissors
  • sage

For this particular project, I used branches from my Weeping Willow. It lost two very large limbs this year due to storms, which I figured I could use for some project eventually. Sure enough, I found a use! Willow trees represent love, tranquility, protection, and growth, all of which correspond to the meaning of a sun wheel, making Willow a great choice for my project, even though it is usually associated with the Moon. You can also use Oak, Birch, or Ash. From one of the limbs, that is miraculously sprouting roots and growing in my brush pile, I snipped off four branches of equal width. Because the limb is still somehow alive, I thanked it for providing me with the cuttings. I used my gardening shears to clip them off and then clip them to equal lengths. I stripped off any small side branches and leaves and brought them inside. If you are using dead or fallen branches, be sure to check them for pests. You may wish to bake the branches in the oven for 10 minutes at 350 degrees Fahrenheit prior to completing this project. That should kill off any possible insects that may be hiding in the bark.

DIY Summer Solstice Sun Wheel
Crystals to increase the potency of my spell.
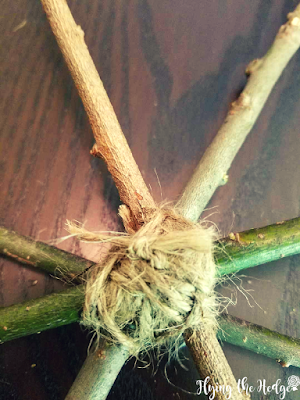
Next, cleanse all your items with the sage or any other type of cleansing herb. This gets rid of any energies your supplies may have picked up, especially if you bought anything from a store. Once the items are cleansed, you need to secure your four branches together with some twine. I began by wrapping two branches together at a time to make an equal-armed cross. Once I had two crosses tied together, I combined them to make my wheel or base for the different yarns, twine, ribbons, and raffia to thread through. This doesn't need to look perfect; however, you want to be sure the branches are secure and will not move. Securing the two equal-armed crosses is by far the toughest part of this entire project.

DIY Summer Solstice Sun Wheel

DIY Summer Solstice Sun Wheel

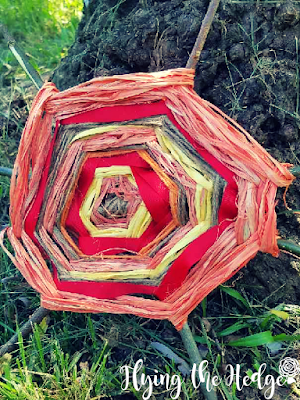
Now that the branches are secure, start threading your yellow yarns, twine, ribbons, and raffia through the branches. I secured the first line by tieing it to the twine used to secure the branches. I found that wrapping the raffia around a section several times produced a more cohesive look and gave me thicker sections faster. Don't worry about what the back looks like; focus only on the front. Alternate between colors and textures to make your own unique design. I picked up my ribbon, yarn, and raffia from my local Dollar Tree. Double check how many yards of each you are purchasing though because I ran out of the orange yarn within seconds and didn't have any more on hand to make a larger section of it. The twine I purchased from the gardening section of Michael's Craft Store, although I am sure there is twine available at the Dollar Tree as well. As you thread the materials through the branches, visualize the sun and all its strength pouring into your sun wheel. You may even wish to chant a litter mantra as you work.

DIY Summer Solstice Sun Wheel
Back: You can see where I tied the knots as I thread the materials.
Once you are finished, place on your altar, hang it up or otherwise display it for all the see. If you wish, you can charge your sun wheel in the sun. Don't leave it there too long, however, as the colors will fade quickly.

DIY Summer Solstice Sun Wheel

DIY Summer Solstice Sun Wheel

DIY Summer Solstice Sun Wheel

And there you have it! A beautiful sun wheel for this Summer Solstice. You'll see mine appear again on my Solstice altar in a couple of weeks. Until then!


DIY Summer Solstice Sun Wheel: See the complete directions on flyingthehedge.com

Friday, February 16, 2018

DIY Self Love Witch Ball

DIY Self Love Witch Ball

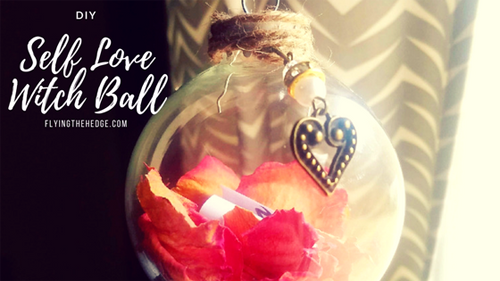
Witch balls have a pretty long and rich history. Originally assumed to be less-than-friendly, modern witches use witch balls as a form of decorative magic. That's right, witch balls are usually prominently displayed in the witch's home or garden to bring about whatever magic they infuse the ball with. This is generally protection magic, but witch balls can be used for any magic you want.

With Valentine's Day under our belts, I decided to honor myself as well and put together a witch ball for self-love. After celebrating everyone else we love in our lives, why not celebrate ourselves as well? This simple witch ball is designed to be a constant reminder that you are enough, even when you do feel like it.

DIY Self Love Witch Ball

Supplies:
Clear, glass/plastic ornament
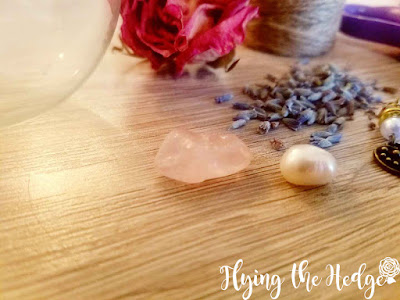
Small chip of rose quartz
Small pearl
Dried rose petals
Dried lavender
Heart-shaped charm
Twine
Small piece of paper
Marker/Pencil/Pen
Scissors

DIY Self Love Witch Ball

Directions:

Begin by cleansing all the items and charging the crystals with your intent.

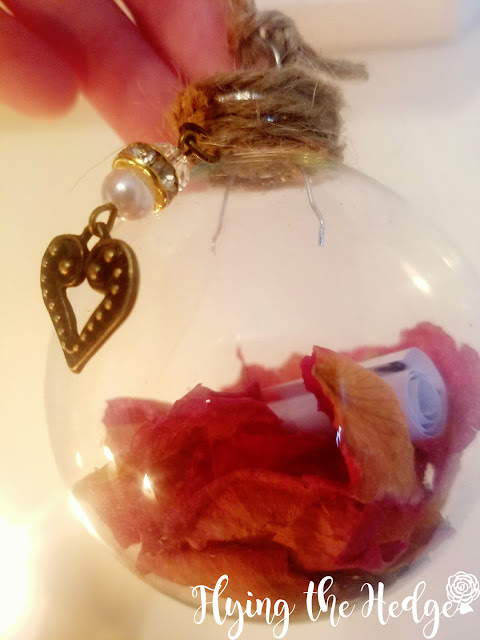
Next, gently place the rose petals and herbs into the witch ball. As you do, visualize your intent.

After adding the flowers, place your rose quartz and pearl into the witch ball. If you are using a glass ornament as I did, you may notice it is not a perfect opening, so test to make sure your crystals will fit prior to beginning. I brought the ball with me to the metaphysical store to ensure the rose quartz was small enough to fit through the opening. If you are using a plastic ball you may notice you can fit large sized items into it because it has some give to it. If you are able, place a heart charm inside the ball as well. I couldn't get my charm to fit, so I set it aside for another spell.

DIY Self Love Witch Ball

On the piece of paper, write an self-love affirmation. I went with " I am enough. I am loved. I am beautiful." These are things I struggle with daily, so I felt they were three of the best affirmations to include in my self-love witch ball.

DIY Self Love Witch Ball

Finally, seal the ball and wrap the top with twine. If you'd like, add a heart charm to the twine prior to wrapping. To secure the first end of the twine, slightly open the top of the witch ball and place a small bit inside. Secure the top and the twine should remain snug. When you are done wrapping the top, you can tie it off, tuck the twine, super glue it, or even seal it with wax. Finish it off with a piece of twine to hang it up or place it in a holder.

DIY Self Love Witch Ball

Place in an area where you will see it daily to remind yourself that you are enough.

DIY Self Love Witch Ball

While the magic seems rather simple, this is a very powerful tool, especially because you made the item and are displaying it as a constant reminder. Sometimes we cast a spell and forget about it because there is nothing left behind in the physical world to remind us of it. Not the case with the witch ball.

DIY Self Love Witch Ball

DIY Self Love Witch Ball

DIY Self Love Witch Ball

How do you show yourself some love?


Wednesday, December 21, 2016

DIY Wildlife Ornaments

DIY Wildlife Ornaments

Yule is a time of giving, honoring life, and celebrating the birth of the Sun. I believe many people get so caught up in giving and receiving presents that they often forget to honor the Earth and all her creatures as well. I'm not trying to downplay giving to other humans. Charitable gifts, volunteering, and loving our families is wonderful and in the spirit of the holiday. However, Mother Earth gives to us year around and she and her creatures deserve a thank you as well.

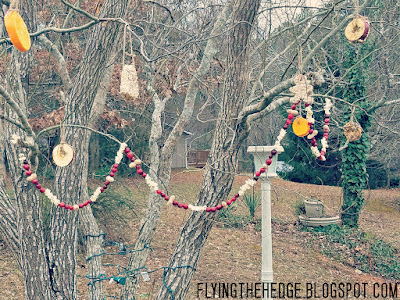
There is a gorgeous evergreen in our backyard. I'm not sure if it was planted as a live Yule tree by the previous owners or if birds brought the tree with them, but it is perfect for honoring Mother Earth and her creatures during Yule. I decided this year I would decorate it with edible ornaments and garland for the wildlife to enjoy. After all, they bring me and my tremendous joy year-round. This is also a great way to let Mother Earth know I appreciate her and all she is provided me with this year.

****

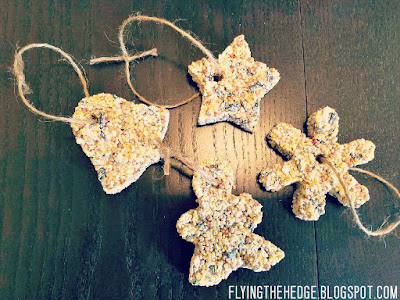
Birdseed Ornaments

DIY Wildlife Ornaments

This is actually a very simple recipe that can be used year-round to create all sorts of bird feeders. Make ornaments, suet feeder blocks, toilet roll feeders, and more!

Ingredients/Materials

4 cups Mixed Bird Seed
1/2 cup Water
3 tablespoons Corn Syrup
3/4 cup Flour
1 envelope unflavored gelatin
Yule-themed Cookie Cutters
Straw
Scissors
Mixing Bowl
Spoon
Waxed Paper
Twine or Ribbon

Directions

First combine the flour, water, gelatin, and corn syrup in a large mixing bowl. Stir until well combined.

Add the birdseed slowly to the mixture and stir until it is well coated.

Place the Yule-themed cookie cutters on the waxed paper and spoon the birdseed mixture into them. Pack it down tightly. You can use a measuring cup or a cup (anything with a flat bottom) to pack the birdseed mixture down and make the surface flat.

DIY Wildlife Ornaments

Using the straw, poke a hole through the top of each birdseed ornament. Make sure it goes all the way through as this is where you will feed your twine or ribbon through to hang them.

Allow the molds to sit for 2-3 hours. Once they are dried and set,  gently remove the straws and cookie cutters. Allow them to dry for at least 2-3 more hours, preferably overnight.

Once they have dried, cut your ribbon (roughly 4 inches) and carefully feed it through the hole. Hang them up outdoors and enjoy watching the wildlife!

DIY Wildlife Ornaments


****

Wildlife Garland

DIY Wildlife Ornaments

This has to be one of my favorite things to make and I am not entirely sure why. For some reason, I love stringing things together. You can use a variety of fruits, vegetables, and nuts to please a wide array of wildlife and add color to your outdoor Yule tree.
Ingredients/Materials

Cranberries
Popcorn
Peanuts
Needle
Fishing line

Directions

If you haven't already done so, pop the popcorn. I had used the stove because I don't own a microwave. Yeah...scandalous I know.

Thread the needle with the string or twine and begin stringing cranberries, oranges, popcorn, and peanuts in the shell. I decided to do roughly 6 feet of garland for my tree since I was adding other decorations for the wildlife as well.

If you want, lay out a pattern beforehand. Be careful with the popcorn; it has a habit of falling apart rather quickly.

If you are using popcorn, don't place outside if rain is expected over the next couple of days. The popcorn will disintegrate before the wildlife is even able to enjoy it!

****

Apple Birdseed Ornaments

DIY Wildlife Ornaments

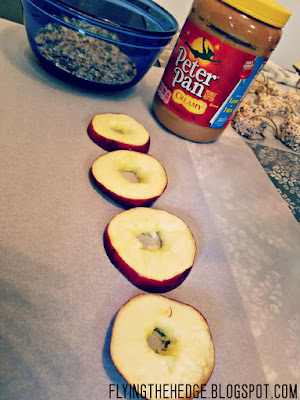
These ornaments are much simpler to make and only require three ingredients. Birds and other wildlife LOVE apples and peanut butter! Be sure to hang these low enough for the deer to enjoy. Apples are one of their favorite treats!

Ingredients/Materials

Peanut butter (creamy or chunky)
Birdseed
1 Apple, sliced and cored.
Twine
Scissors
Waxed Paper
Spoon or Knife

Directions

Spread you a sheet of waxed paper. Smear one side of the apple with peanut butter and dip in some birdseed. You want to make sure the peanut butter is completely coated with birdseed. Place on the waxed paper. Continue this process until all of the slices are complete.

DIY Wildlife Ornaments

Cut some lengths of twine and tie through the cored apple slices. Hang on your tree and enjoy watching the wildlife! Be sure to hang these low enough for the deer to enjoy as well!

****

And there you have it! Three wonderfully simple projects to bring some joy and cheer to our animal friends and honor Mother Earth for all she provides for us. I also added some orange slices to brighten up the tree and be another little snack for all the animals that visit my yard. I think it turned out rather nicely!

DIY Wildlife Ornaments

DIY Wildlife Ornaments

Merry Yule everyone!


Tuesday, December 20, 2016

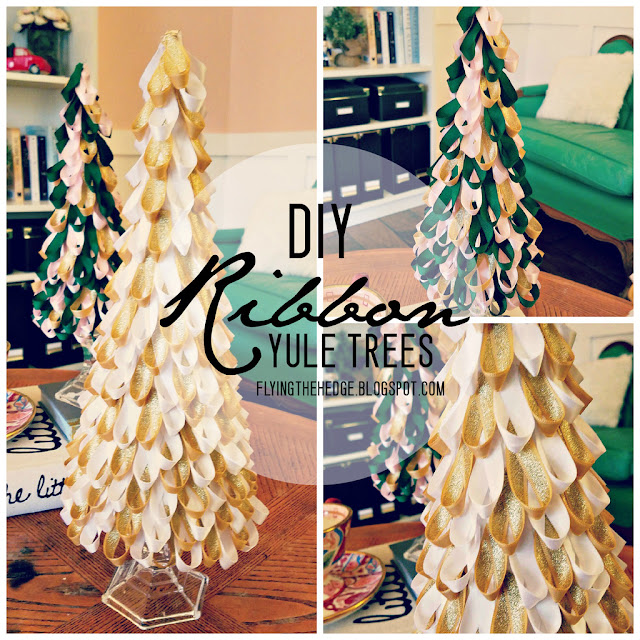
DIY Ribbon Yule Trees

DIY Ribbon Yule Trees

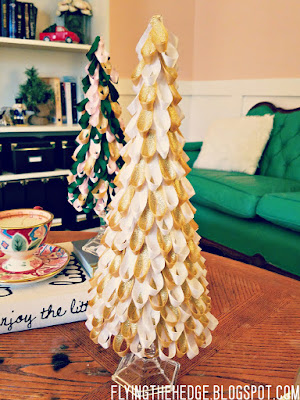
A couple of years ago I saw some beautiful felt trees in the holiday section at Target. I decided I could make my own for significantly less and set off to the store to buy some paper mache cones, green felt, and red pompoms. Guess what! They have been sitting in my storage closet since. I sat down 2 weeks ago and began cutting out the felt and realized it wasn't work it. I didn't even want dark green trees anymore! Plus, it was starting to hurt my hand. No one wants that. So I ventured off to Pinterest to gather some new ideas. That is when my ribbon Yule trees were born!

My library is green, pink, and white with splashes of brown. I wanted my ribbon trees to watch my living room so I set off to find pink, green, and white ribbons! My husband calls the library the Neapolitan room. Not gonna lie, it does make me want ice cream whenever I am in there...or tea. Same thing right?!

Materials

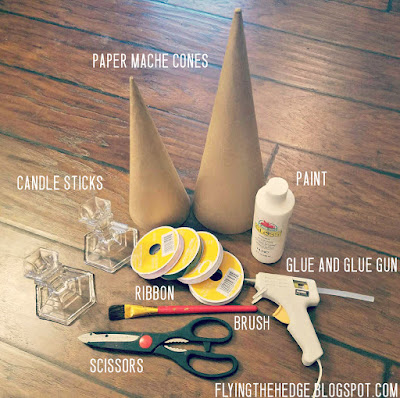
Colored Ribbons (any color you desire)
Paper Mache Cones (1-2 of various sizes)
Cardboard
Candle Sticks (from the Dollar Tree. 1 for each tree)
White paint (or another color to match your ribbon)
Hot Glue and Hot Glue Gun
Scissors
Optional: Glitter, small colored pompoms, small doll sized ornaments or tree toppers, fairy lights

DIY Ribbon Yule Trees

Directions

Begin by using the cone to draw a circle the size of the base on the cardboard. Cut out the circle just slightly smaller than the base. You want this circle to fit up inside the cone slightly. Hot glue the cardboard circles into place.

DIY Ribbon Yule Trees

Next, paint the paper mache cones. If you'd like, you can also spray paint your candle sticks. I liked the glass look so I kept them in their original finish. Allow to completely dry.

DIY Ribbon Yule Trees

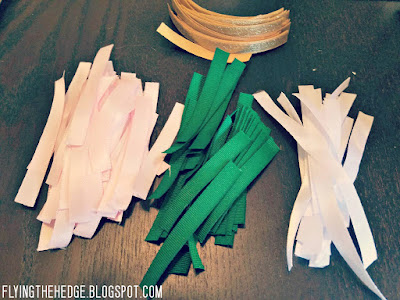
While the paint is drying, begin cutting strips of ribbon 2- 2.5 inches in length. I cut about 20 strips and worked with them until I ran out. If you want, feel free to cut an entire roll. It takes just over 1 rolls of each color to complete the larger cone if you are only doing it in two colors as I did.

DIY Ribbon Yule Trees

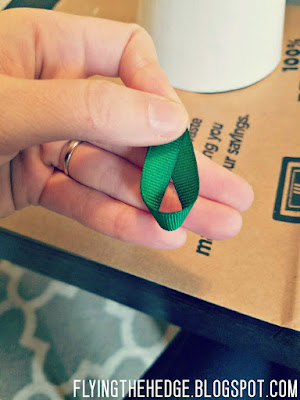
Twist the ribbon to form a loop, and begin hot gluing the loops to your cones starting at the base and working upwards. Make sure to stagger and overlap the loops to cover up the bulk of the cone. You want your trees to look full.

DIY Ribbon Yule Trees

DIY Ribbon Yule Trees

DIY Ribbon Yule Trees

DIY Ribbon Yule Trees

Finally hot glue the candlestick to the cardboard base and viola! beautiful ribbon Yule trees! If you would like, you can add glitter, colored pompoms, doll-sized ornaments or tree toppers, or even fairy lights to add some dimension to your trees. I used glittered gold ribbon which was enough for my tastes. Very magical indeed!

DIY Ribbon Yule Trees

DIY Ribbon Yule Trees

DIY Ribbon Yule Trees

DIY Ribbon Yule Trees

DIY Ribbon Yule Trees

Have you done any Yule inspired crafts this year? Did you try this one? I'd love to see pictures of your work in the comments!

Have a Blessed Yule!