SOCIAL MEDIA

Wednesday, November 18, 2015

Magical and Medicinal Uses of Mistletoe

Magical and Medicinal Uses of Mistletoe. Includes FREE BOS Page!
Gender: Masculine
Planet: Sun
Element: Air
Powers: Exorcism, Fertility, Health, Hunting, Love, Protection
Magical Uses and History: Mistletoe has a long and rich history, especially in regards to Yule and Christmas, where it is traditionally hung from the ceiling and used as an excuse to kiss a loved one. This tradition originates from a couple different sources, including a Norse legend and peace tradition. The first is the Norse legend of Baldur and Frigg. Frigg loved her son so much she exacted promises from all things in the earth and below the earth asking that they never harm Baldur. Mistletoe, however, did not make any such promise as it doesn't grow in or below the earth. When Loki gave Baldur's brother, Hod, a spear of mistletoe and tricked him into firing at his brother, Baldur died. Frigg shed many tears which became the berries of mistletoe. However, when Baldur was resurrected, Frigg made mistletoe a symbol of love, hence its symbolism. The second is the tradition of calling a truce if mistletoe is spotted hanging over head during a fight or battle. From this story and tradition grew the practice of hanging mistletoe over the door or suspending it from the ceiling as a symbol of peace, good will, and love.

The history of mistletoe goes back much further than its current Yuletide tradition, however. The ancient Celts believed mistletoe to be a gift from the gods as it is a plant that does not grow in the earth. Furthermore, it remains green throughout the year, producing pure white berries right before the winter solstice which makes it very unique for the season. Right after the winter solstice, a Druid priest would use a golden sickle to cut the plant to be used used for protection, increased fertility, and, despite it being poisonous, so heal diseases. It was never allowed to touch the ground whereby it would lose its power.

Hang mistletoe wherever you wish to safe guard against lightning, disease, fires, or misfortune. It can also be hung in cradles to protect children from being stolen away by faeries in the night. Iron works well too. If you wish to increase hunting success or fertility, carry it in your pocket. Burn it to banish evil.

Mistletoe can be used in a number of spells including:
     Fertility Magic
     Love Spells
     Banishing Spells
     Protection Magic
    
Medicinal Uses: Mistletoe, when taken internally, is an excellent nervine. It will quite the nerves and soothe the mind. It also works to reduce heart rate and blood pressure. It is great for treating headaches caused by high blood pressure. For a particularly potent mixture, combine with Hawthorn Berries and Lime Blossom.

Preparation and Dosage:  Only use dried leafy twigs. The berries are poisonous! Collect young leafy twigs in the spring and dry them accordingly. To make an infusion, pour 1 cup boiling water into 1-2 teaspoonfuls of dried herb and allow to infuse for 10-15 minutes. Drink up to three times a day. For a tincture, take 1-4 milliliters up to three times a day.


Want to print a copy of this for your Book of Shadows? Click below for your free copy!
https://drive.google.com/file/d/0B0KnNmfNfzc8Q0R2cXBMUVpQcm8/view?usp=sharing

Friday, November 6, 2015

DIY Painted Fabric Couch

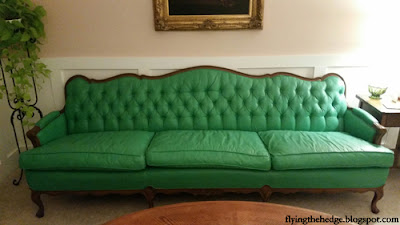
This has got to be my favorite project of all time. I bought an ugly floral antique couch for $100 over 2 years ago and have been staring at the floral print wondering what to do with it. The lines and curves are stunning and the tufted back is gorgeous. I knew I wanted to keep all of that, just not the floral pattern. However, I had been at a loss of what to do. Reupholstering the couch was going to cost me an arm and a leg if I hired someone, and if I did it myself I ran the risk of destroying any expensive fabric I bought. Either way, I was going to be out a pretty penny. So I started researching ideas on Pinterest.

DIY Painted Fabric Couch

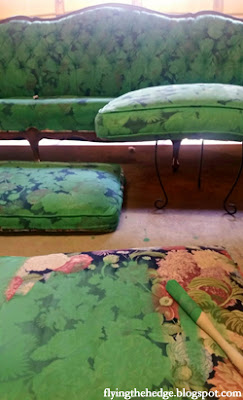
That is when I found people painting their chairs, seats, ottomans, and couches with Annie Sloan chalk paint. This paint is by no means cheap. In fact, I bought two quarts in Antibes green and Florence blue and a large container of clear wax and spent $111, more than I spent on the couch! But it was worth it. I spent months researching the best way to paint fabric before I was willing to jump in and take the risk of painting my own couch. Many people mentioned how stiff the fabric was afterwards and that they only used it on chairs they never sit in. Well, I was going to sit on this couch, often, and I wanted it to be comfortable.

And then I had an idea. Why not thin down the paint? Why not use the paint more as a dye than as a paint? Most of these people were just slapping straight paint on their fabric and wondering why it was so rough. I did a little more research and found some others had the same idea so I went for it.

I purchased my paint and wax (to seal the paint and give it a leathery feel) and got to work.

DIY Painted Fabric Couch

To achieve my amazing green color, I mixed half Antibes green and half Florence blue. To thin it, I used 1 part paint and 1 part water. So, I added one cup of water to one cup of paint. I cleaned the couch, sprayed it lightly with water from a spray bottle to prep the fabric and started painting.

I allowed the paint to dry for a couple of hours before applying another coat. Some people said to give it 24 hours to make sure the padding was dry, but after pressing down on it completely and seeing that nothing came up, I decided it was safe to add another coat. I sanded in between coats with a fine grit sanding block (220 grit) and sprayed the fabric with water again to prep it. I did this for FIVE coats. Yes, FIVE coats. It took that many to cover all the floral pattern. I only did 3 coats on the bottom of the seat cushions and the bottom of the couch itself. These were places you aren't ever going to see, so I didn't feel like taking the extra day covering them.

DIY Painted Fabric Couch

Once the paint had dried over night, I added a coat of wax. I just applied this with my hands. I tried doing it with a shirt, but I couldn't get a feel for the wax and the shirt kept leaving lint. I let the wax cure for several days before I buffed it. I did apply too much wax some places so it is rubbing off on my clothes, but it washes off with soap and water.

DIY Painted Fabric Couch

Is it crunchy? Nope! Not one bit. It feels soft and subtle like leather! If I could, I'd spend all day sitting on it.
 
DIY Painted Fabric Couch

I can't even begin to tell you how happy I am with it. It completely makes the room.

DIY Painted Fabric Couch

This is a time consuming process and you need to take your time and do it right, but it is totally worth it. So next time you find a beautiful chair or couch with an ugly print, remember, you can paint it!


Monday, November 2, 2015

Living Room Before and After

A couple of weekends ago my dad came over to help me make over our living room. It's not completely finished, as we will be ripping up the carpet within the next couple of weeks and putting down laminate hardwoods, but I'd like to show you how it is looking so far.

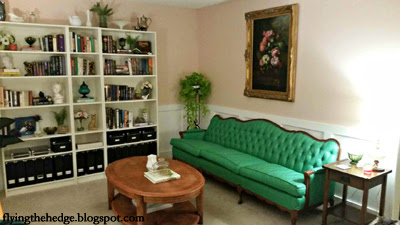
This room is small and very dark. The only window is covered by our front porch and the popcorn ceiling, heavy curtains (left by the owner), wood baseboards, and dark cream paint were not helping in the least. I knew I wanted to get rid of the trim and replace it with board and batten wanes coating. Having semi-gloss white 3 feet up the walls would dramatically change the room. And it did.

To get started my dad and I pulled up all the old baseboards.

Living Room Before and After

And then we started measuring. We placed a thicker baseboard down, some 6 inches I believe, and used 4 inch boards for everything else, including framing the door and the window. The window was not previously frames and boy, oh boy did framing it make a difference. All of this was nailed into place where there are studs. By anchoring the baseboard and the plate rail to the studs, you ensure a tight fit that isn't going to pull away from the wall easily.

Living Room Before and After

After we laid it out, we glued and nailed the spacers into place and my mom came over to help me prime the raw wood.

Living Room Before and After

Finally my husband and I gave it all two coats of semi-gloss white paint. The room immediately changed. Quite dramatically actually.

For the top wall, I picked a light pink called Romance. I knew I wanted pink, but I didn't want in your face pink. This is warm and cheery without being over powering. I adore it. I did take the opportunity to paint protective symbols under the pink (in pink of course) before going over it with two coats. A little extra protection can't hurt. I'm sorry I don't have pictures. It was in the middle of the night when I began painting and I couldn't get a good picture. I also apologize for the quality of these pictures. The room is dark no matter what I do, so taking a good picture is difficult.

Living Room Before and After

Living Room Before and After

We modeled this room after a painting our friend Jose gave us some time ago. Its gorgeous, isn't it?

Living Room Before and After

I still have some work to do in this room apart from ripping up the carpet, but it is well on its way. I'll keep you posted when we make some more updates, including recovering that dingy blue chair I bought at Goodwill for $12.

Now you may have noticed that lovely green antique couch. That project will be in an upcoming post. I can't wait to share it with you.

It is coming along! I'm still adding decorative touches, including some more plates to the wall, but I'm very happy with the room so far. What do you think?